
Despite this click-bait look-like title, it’s a true story !
DISCLAIMER : this is the story of a social experiment, and I strongly suggest to avoid this kind of experience without knowing what you’re doing. It could lead to a real scam and you may loose money or worse.
Ok, let me explain
🥷 A few weeks ago, I’ve been contacted by an anonymous number on WhatsApp, a lady suggesting she was representing a company and she was proposing small jobs, and I could receive 20$ easily and even more later.
👀 I’m naturally curious, and in the mindset “know your enemy”, so I replied to understand what’s the catch/scam.
🎯 1st mission is simple, 3 Instagram posts to like and provide proof. I dit it, and the lady provide me a contact on Telegram to be paid, called “the receptionist” (John Wick style at the Continental 😅)
💰 The receptionist asked for a wallet address to send 20 USDT, and some information (name, age, job). I provided fake information, but real wallet address. (Real wallet address is not a risk, as it doesn’t come with login or identification information)
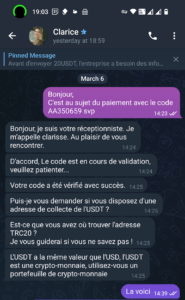
A few minute later, 20 real USDT were delivered on my wallet.
🥴 Really surprised, I continued the chat and the receptionist offers more missions but it became sketchy: send 100$ somewhere, and receive 140$, 10 minutes later (+a few Instagram post to like).
🚩 Definitely a big red flag for a scam !
The receptionist also provided a Telegram group, filled with thousand of posts of people posting proof of their “missions” and “gains”.


🧐Troubling points
– A scammer that send real money first ?
– Hundred of users in a Telegram group showing proofs for days: it’s time consuming to create a such elaborate scam with 10k different screenshots and hundreds of profiles
– Screenshot of crypto transfer are always dated a few seconds before the post (like a real screenshot)
🚩 Red flags
– The greed factor is a well known scam technic
– “Easy” money is not real, there is always a looser somewhere
– Anonymous contact, code-name, cryptocurrency: classic in scam
– Screenshot are a little bit to perfect (no Android or iPhone toolbar, only a perfect cropped screenshot, each time) : generating a fake screenshot is not difficult
🔎 At this stage, I’m hesitating between 2 scenarios, all nasty:
– A simple greed-scam, to push you sending money and hope for more gains. Only troubling point is scammer that start sending you money..
– A elaborated laundering system : to clean stolen cryptocurrency, you send your real money to a “clean” wallet, and they send you back 130% of it from a dirty account (linked to robbery and probably monitored by authorities)
What do you think ?
The story repeats again, 2 weeks after, but this time through an SMS.
It lead me again to a telegram account, a lady again, proposing me a similar deal : “buying” theater tickets on a shady website.
A really fun, badly design website, with fake loading bar when “buying tickets”.


Of course, the lady tried to get me to invest more money, but that’s where the scam take place !
